I will start today post by wishing my daughter Mary a Happy Birthday!
Here is the card I made for her!
I am so excited about these paints! The more I use them the more I them!
They are the best colors and they go on beautifully to a variety of surfaces.

Check them out here at LIITD!
Ranger Sticky Back Canvas! Which is exactly what you would think. It is canvas sheets that are sticky on the back. They come with a paper backing you can cut the with scissors, paper trimmer, Sizzix machine. When you are ready to adhere the canvas to your project simple remove the backing and stick.
I first cut out these shapes using my Sizzix.

Then painted them with the Claudine Hellmuth paints.

Then using a stamp and black archival ink I stamped a pattern over the dried paint. I layered the different parts of the flower and curled up the petal of one layer to create a center.

I also cut out freehand some triangle shapes to make a banner.

I painted them and again stamped a pattern over the painted surface. This was a great way to use up some of the waste you have when you are cutting out the flower parts.


Here is the card:
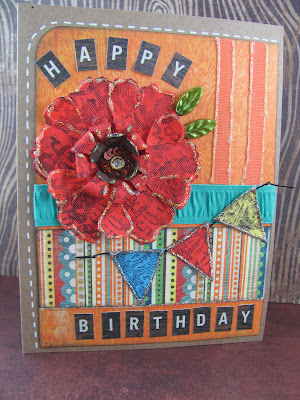
I outlined the flower in stickles, added some strips of the painted canvas that were also outlined in stickles to balance out the design of the card.
The paper I used for this card is from 6x6 pad- Basic Grey "Life of the Party" line.


wow! That is a beautiful card! Mary is a lucky girl to have a mom who creates such wonderful memories. You do inspire me, but I think I will just look at your creations rather than try to create some. Thanks for the good ideas though!
ReplyDelete